Upp Money tool is extremely flexible and can be used in many different ways. In this article we'll explain how to move your contractors' settlements accounting from sticky notes or WhatsApp messages to Upp
The problem
Say you run a construction company and you have a complex project with several side contractors (or workers) involved.
Each contractor reports you of expenses made on the project by WhatsApp.
And now imagine what happens when you have dozens of messages from your contractors every day. How will you summarize expenses each contractor made?
Of course, you can scroll WhatsApp history with every contractor trying to bring out all reported expenses (which are certainly mixed up with another messages), and write them down on paper... Or you may ask your contractors to send their current "balances" each time they report an expense. Obviously, all that can cause errors, even if you do all accounting alone. And what if you work in a team?
The solution
Upp Money tool allows you to create any number of "wallets" where you can store income and expense transactions. Transactions can be linked to your orders, so you can control your settlements with each contractor in the context of specific order.
So you should create dedicated wallet for each of your contractors and write down every expense they report there.
Sounds a bit challenging, but since Upp is focused on mobility, it shouldn't take much longer than your sticky notes :)
How to set up
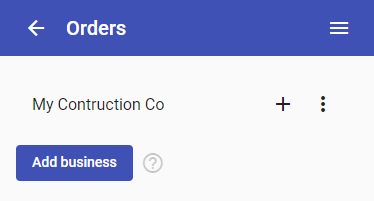
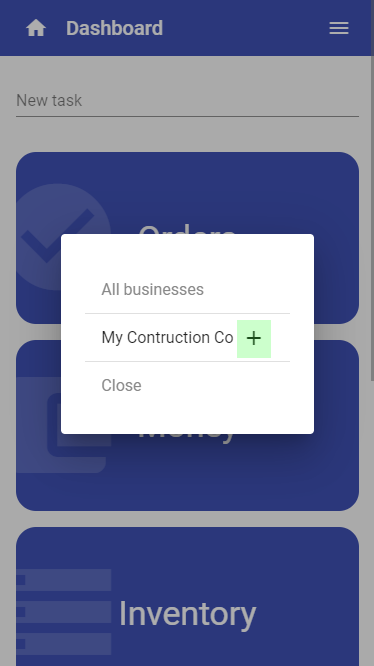
First, you must have a "business" created in Upp Orders tool. Open "Orders" section in the main menu:

If you don't have anything here, press "Add business". In our example we already have a "business" named "My Construction Co":
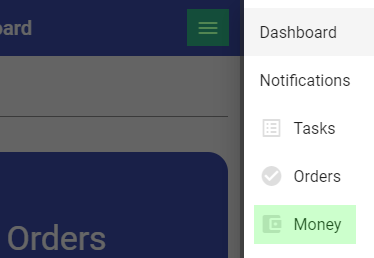
Next, open the Money section in the main menu:
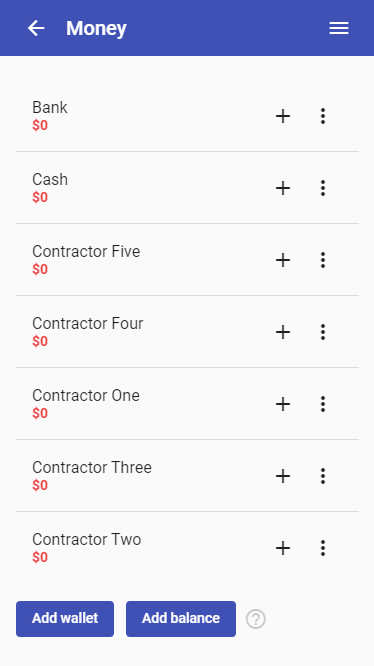
Here we have two wallets to keep records of our company income and expenses — "Bank" and "Cash":

Now add some "wallets". Each wallet represents one of your contractors (partners, workers). If you didn't have any corporate wallets before (in our example it's Bank and Cash), add at least one to store your corporate transactions.
Press "Add wallet" button to create a wallet:

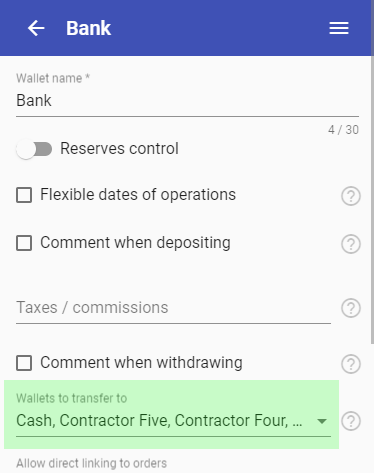
In the wallet settings you can set its name and select your business in the "Allow direct linking to orders" field:
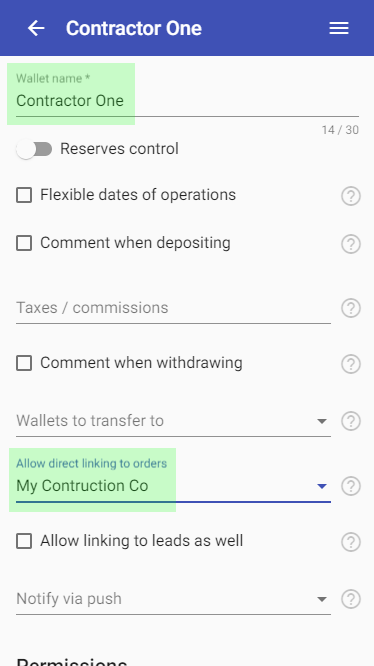
"Allow direct linking to orders" field is useful to reduce the number of steps you'll need to add new transactions related to your orders. We'll show how it works below.
You may also set up permissions to the wallet for your colleagues and partners (they must be added to Users in the main menu), select users to receive push notifications, and make other wallet settings right away.
After all set, go back to your list of wallets:

Create other contractors wallets. You may copy the first wallet you've just created:
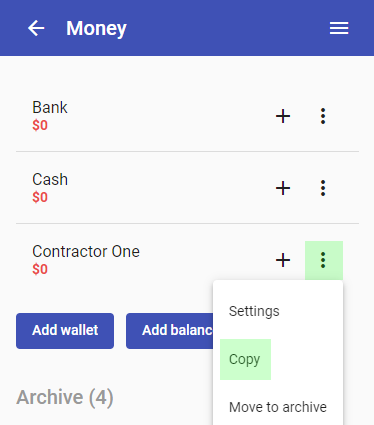
Finally, you'll get someting like this:
You may also configure available transfers. For example, you can transfer your bank account funds to your contractors. Then, open Bank wallet settings:
And add your contractors wallets to the "Wallets to transfer to" field:
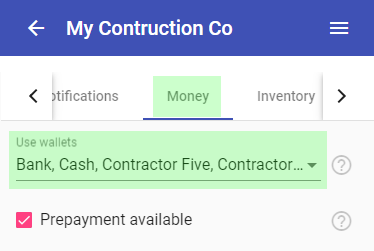
After wallets are all set, go back to your "business" settings to add new wallets there:

Find the Money tab:
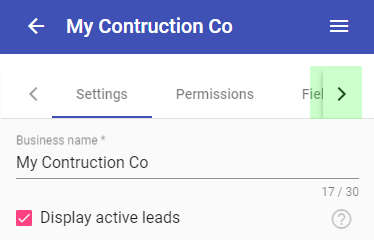
And add all your wallets to the "Use wallets" field.
Now proceed to the "Fields" tab and make sure you have "Order items list" field enabled:

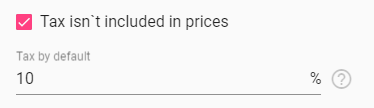
If you don't include taxes in your prices, but you want to calculate and add them automatically, set the "Tax isn't included in prices" checkbox and fill the default tax rate:
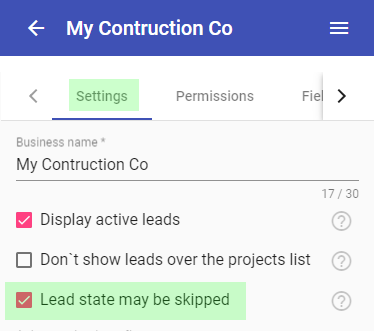
Now set "Lead state may be skipped" option in the "Main" tab:
Good job!
How the hell it works? :)
Let's take an example.
You have a project which includes 5 types of work:
- Permits: $500 + 10% tax
- Demolishing: $2000 + 10% tax
- Masonry: $4000 + 10% tax
- Roofing: $5000 + 10% tax
- Cleaning: $700 + 10% tax
Let's imagine your "Contractor One" makes demolishing, cleaning and masonry works for $5000 and "Contractor Two" gives a $3000 bid for roofing. Bids include all taxes.
The first thing you should do is to create an order. Let's start from the dashboard. Press "Orders" button and then + next to your "business" name:
Fill in some client data and press "Add order" button:
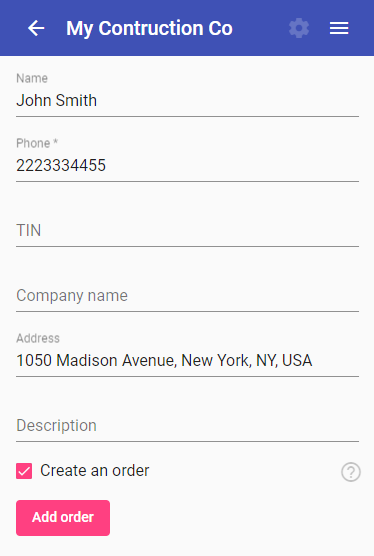
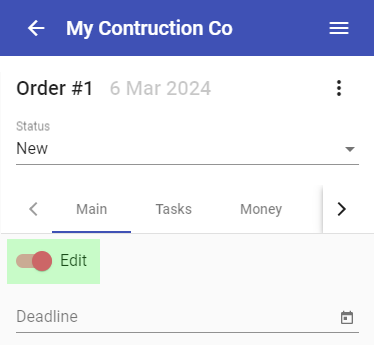
Your order will look like this:

Scroll down and add your order items using + button. You may also add "Group" field to some items and write the name of responsible contractor there:

When finished, scroll up and exit the "Edit" mode:
You'll see that your order items will look like this:
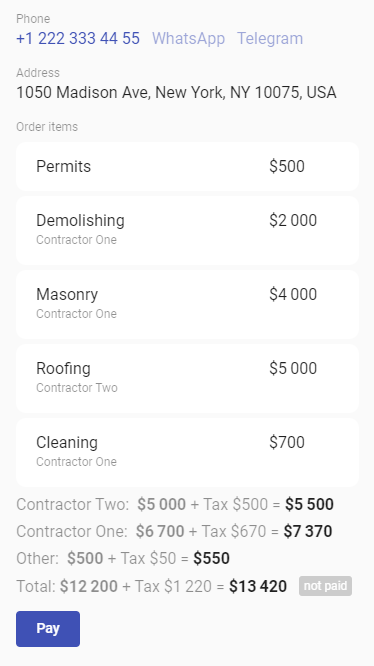
You see the totals are divided into "groups" (in our case — contractors). It can be useful. Or may not :) You decide.
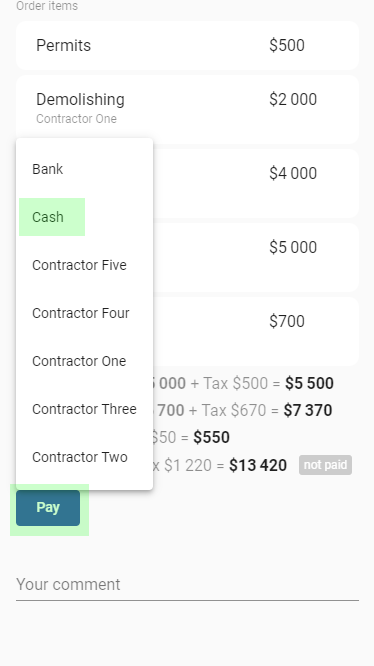
Now let's imagine the order was paid by your client in cash. You can press "Pay" button and select your "Cash" wallet:
You'll see the new transaction flow, where order total is prefilled. But you always can change the amount (in case of the partial payment):
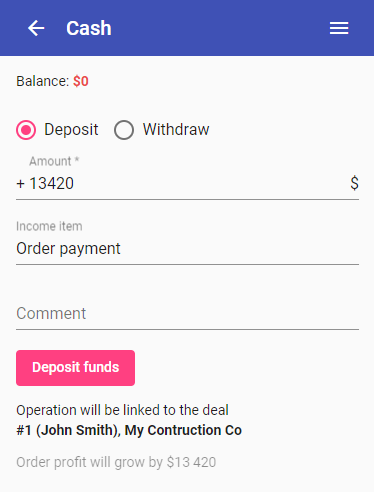
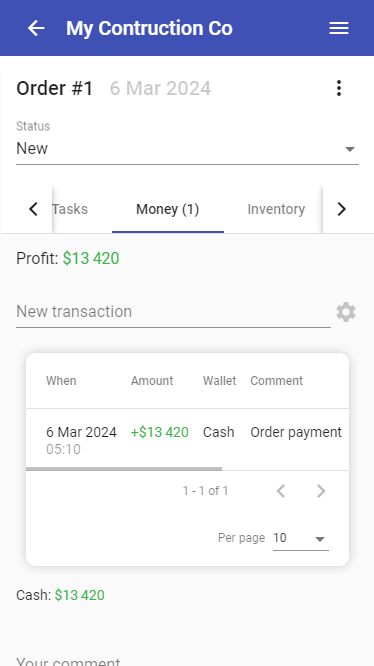
After the deposit is made, you'll get back to your order with "Money" tab opened. Here all order transactions will be stored:
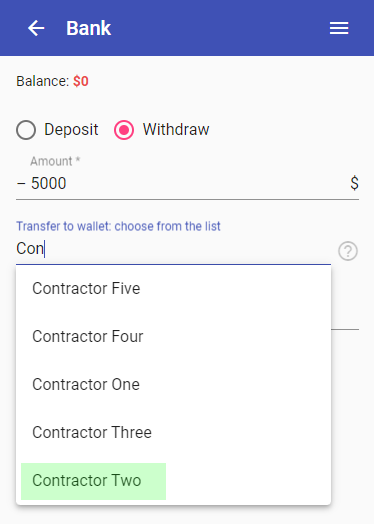
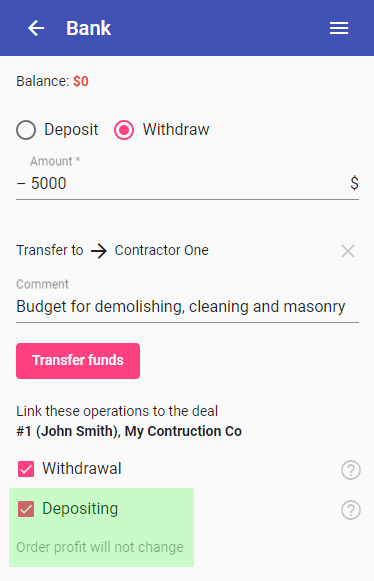
Now let's divide order budget between our contractors. Let's suppose that we pay our contractors via bank account. So what we have to do is to make two transfers from our Bank wallet to corresponding contractors wallets. Select "Bank" in "New transaction" field:

Choose "Withdrawal", set amount to $5000 and select "Contractor One" wallet in "Transfer to wallet" field. We transfer $5000 because it was his bid in our example:
Now here is a trick, please, pay attention. After you choose your contractor wallet, everything will look like this:
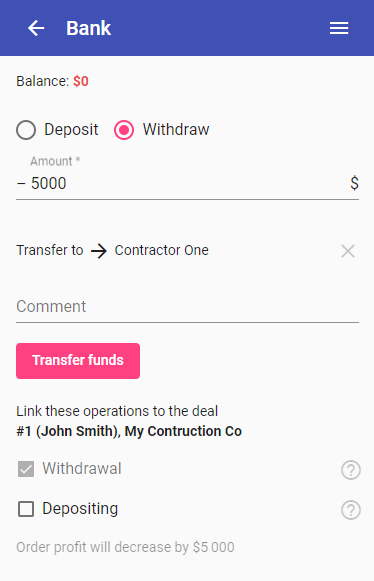
Before pressing "Transfer funds" button you must select "Depositing" option at the bottom. This will include all two transactions (withdrawal from your wallet and depositing to the contractor wallet) in the list of order transactions, and it's crucial to keep your order profit data correct. So check the "Depositing" checkbox and proceed:
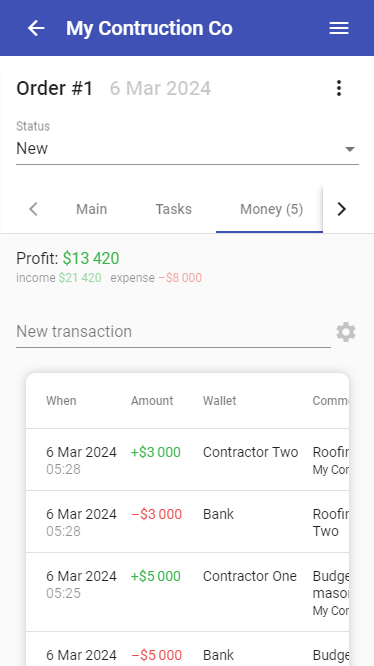
You'll again see the Money tab in your order, which now contains 3 transactions:

Act the same way with the second contractor: withdraw his budget (bid) $3000 from your Bank wallet and send to the "Contractor Two" wallet:
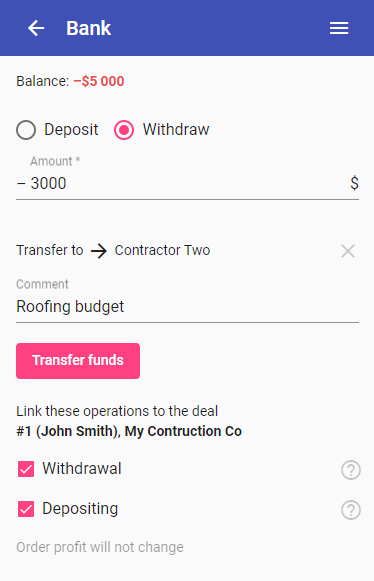
Don't forget about the magical "Deposit" checkbox on the bottom :)
Now everything is ready. We have order profit $13420 unchanged, because we have no expenses yet. We’ve just moved some of our funds to our contractors, but they haven’t earned them yet — it’s still our money :)
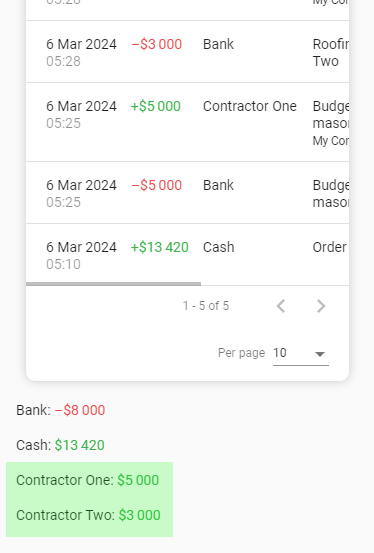
Under the transactions table you can find the breakdown of your contractors budgets:
Now our order is ready for smooth expenses accounting. Finally. At first it may seem a bit confusing, but you'll see how easy everything will be further. Because the main time-consuming part in all this accounting process is adding expenses. There can be hundreds of expenses, distributed in time, and each one must be recorded as fast as possible.
Well, here is how you add an expense transaction. Let's begin from the dashboard. For example, Contractor One reports that he spent $100 on transportation. Press the big Money button and then + button of Contractor One wallet:
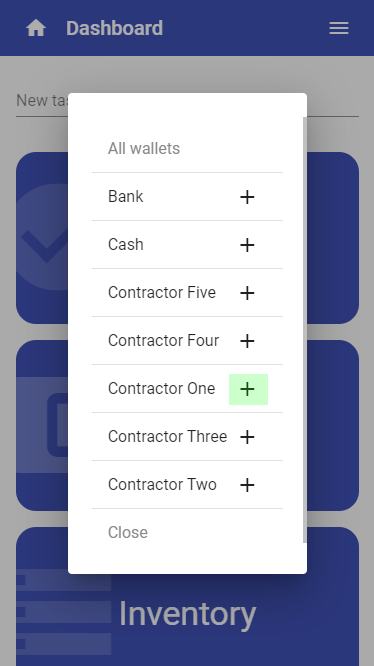
You'll see the magical "Link to order" field, which allows you to define that transaction is related to some order:
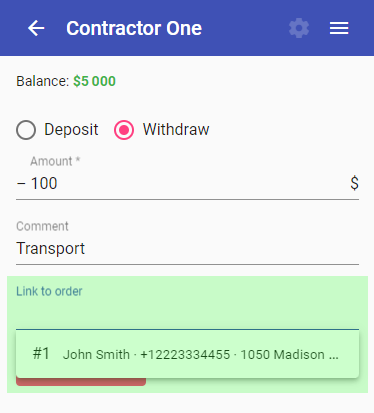
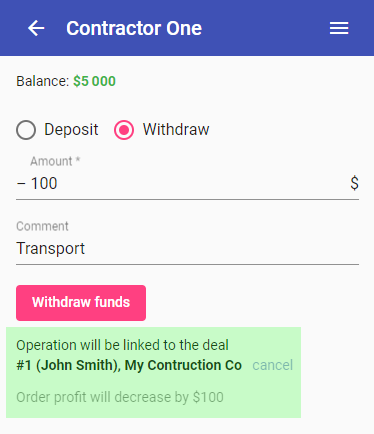
Now we have only one order, but if you’ll have many — we got you covered, there is a quick search ;) After selecting the order, you'll see the notice that the transaction will now be linked to the selected order and will affect its profit:
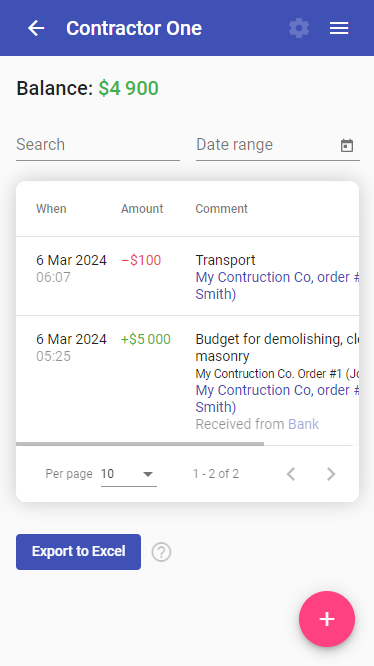
After adding the transaction you'll see the list of all contractors' transactions (if he works on several orders, here you'll see transactions from all orders):
To add another transaction (for the other contractor) you can go back to your wallets list and proceed again and again as described above:
After a couple of transactions our wallets list may look like this:
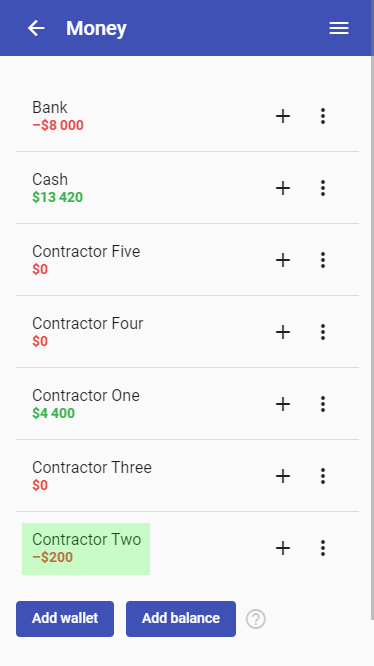
Note that the balance of Contractor Two became negative. It's the signal of overspend. It means that he obviosly exceeded his budgets.
Now, when you open your order, Money tab, you'll see the overspend in the breakdown under the transactions table:

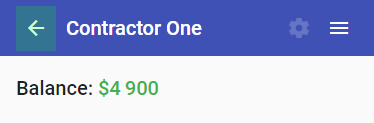
Contractor Two has an overspend of $200 while Contractor One spent only $600 and has $4400 of his budget left at the moment.
Some thoughts on speed
The method for adding transactions described above consists of 8 actions:
- Opening Upp app
- Pressing Money button
- Pressing + button next to the required wallet
- Selecting operation type (for example, Withdrawal)
- Amount input
- Description input
- Choosing an order
- Pressing submit button
One expense transaction made in this way takes about 10 seconds.
You can also add transactions from within the order, from the Money tab, but in that case you'll make 10 actions:
- Opening Upp app
- Pressing Orders button
- Opening the list of orders
- Finding the order
- Opening the Money tab inside the order
- Finding the proper wallet
- Selecting operation type
- Amount input
- Description input
- Pressing submit button
If you act this way, one expense transaction can take more than 20 seconds.